
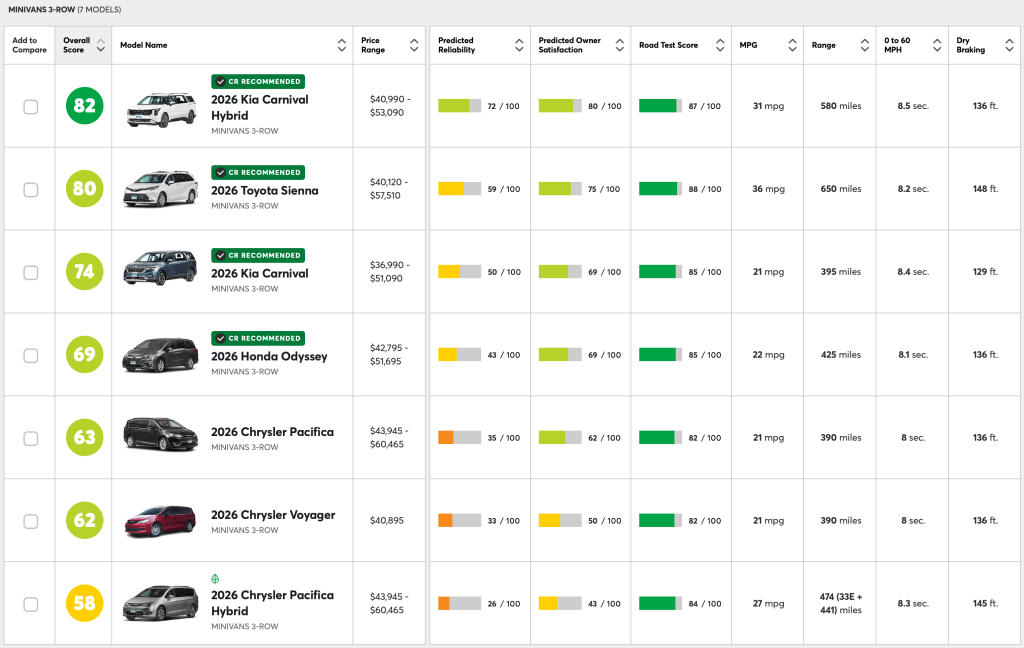
A few weeks ago, I purchased a 2026 Kia Carnival Hybrid SX minivan for nearly 10% off the MSRP alongside the special financing interest rate (2.9% for 60 months) offered by Kia Financial.

From the time I made first contact with any dealer to making the deal took just six hours, and I drove home the new car that night. To be clear, I wasn’t in active discussion for six hours, this is just the time it took for a dealer to agree to my terms – I was at work and I returned messages over email and sms during breaks.
I didn’t visit anyone until the deal was made and I came in simply to sign papers after sharing my documents and doing my credit application online.
In this post, I’ll talk about my process, how it’s a bit different from conventional wisdom, and how you can save yourself time, stress, and money doing the same thing. The entire approach boils down to three steps. It works best if you have strong credit, no trade-in, flexibility on timing, and access to multiple dealers.
- Know What You Want
- Know the Dealer’s Situation
- Commit to a Price and Make the First Offer
First, know what you want. This step is about eliminating uncertainty before you ever negotiate, so price becomes the only variable. Research the car and trim level(s) that you want along with any options you want and anything you absolutely do not want. This helps you be clear on where you’re flexible.
If needed, go to a dealer, tell them you’re not looking to buy right then, but want to test drive and look at cars. You can also watch video reviews on YouTube or ask LLMs like ChatGPT to help you explore exactly what you want. This preparation time prevents you making an error during negotiations.
For me, I knew I wanted a Hybrid SX with 8 seats (not 7) and I didn’t need any options. I definitely did not want the Entertainment Screens in the rear rows – I would not have taken them for free. I was not particularly interested in the highest level trim, the SX Prestige, but I was open to it if there was an 8 seat model for a screaming deal – meaning if the dealer could offer a better value price on the SX Prestige than the SX, I would be open.
I was open to any interior and exterior colors, and my approach was I want the cheapest SX trim available.
Second, it’s helpful to understand the dealer situation. This step is about timing and incentives, not price. Do they have any previous model years (2025 versus 2026) they need (typically late summer, early fall) to get rid of? Is this an end of month, end of quarter, or end of year timeline in which a dealer may be focused on hitting sales targets? Basically, think about whether a dealer has a strong incentive to sell. At the same time, consider your own timeline. Do you have to buy now, or can you wait for the best situation? Obviously, the latter is better so you don’t place stress on yourself to close the right deal. Ideally, giving yourself a few months allows you to wait for the right situation – this could be in financing, end-of / holiday promotions, or other aspects that give you more leverage.
Essentially, think through what are their incentives to offer you the right deal right now?
I was not in a rush to buy but suspected that the best deals would be in December rather than in Q1 2026 – I thought that with December marking the end of the year, dealers might be more open to selling at discount, even though minivans in general are a popular, low discount car type. When I saw that Kia offered strong financing (2.9% for 5 years / 60 months) in November and then December, I was confident the time to buy was now.
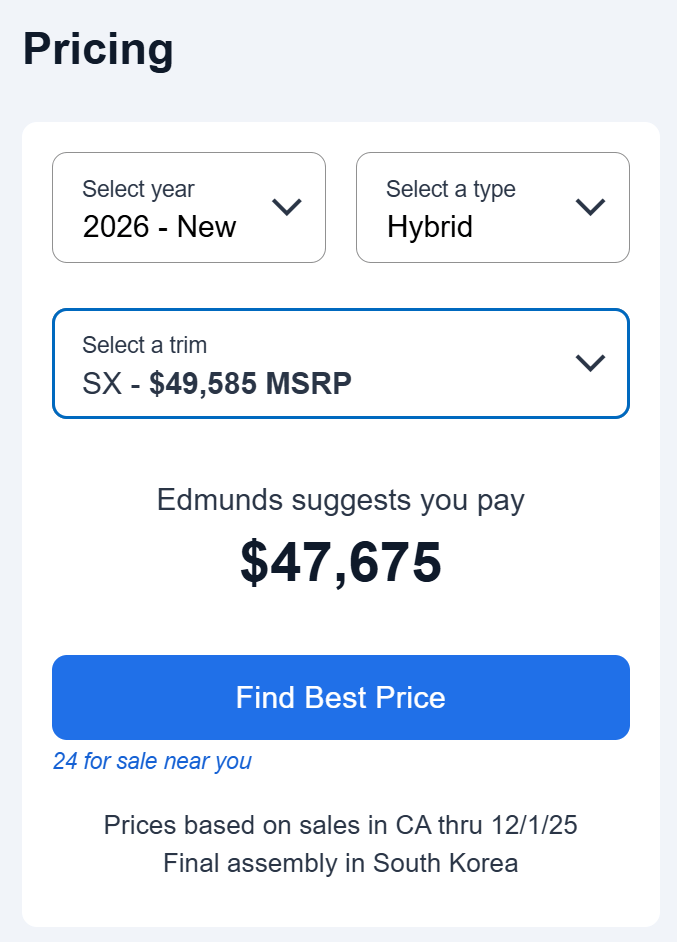
Finally, decide what price you want. This is where most deals stall, because neither side wants to make the first real commitment. I had already watched the Carnival market for months and had a strong internal sense of price ranges. You can shortcut this by establishing a number using Edmunds, forums, and recent listings.
Traditional wisdom suggests you shop around for price. Get an offer at X dealer, ask Y dealer to beat, and so on. The problem here is that every dealer is happy to beat another dealer’s price, but they don’t want to commit to a low price first because they know you’re going to just use it against them. From my professional experience, I find that business deals stall because neither side wants to make the initial proposal. This is why I’ve gotten used to doing so, even though I know that invites scrutiny. My approach is to know what I want and then move things forward as much as I can.
There are a few ways to get a sense of a “good” price.
One option is Edmunds.
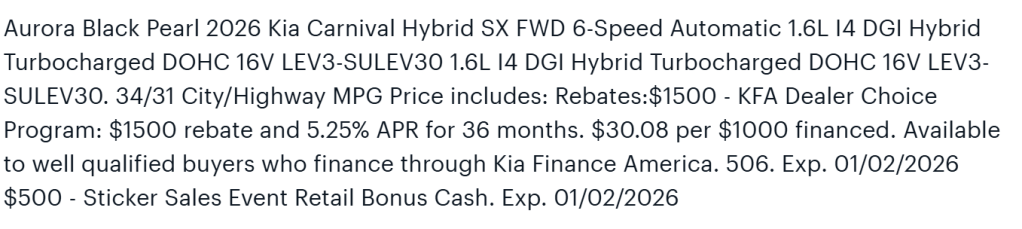
Another is popular communities for your targeted car, like on Reddit or Facebook Groups. If you’re browsing communities, people will often quote OTD numbers, but those are only useful once you strip out taxes, DMV, and trade-ins. If you want specific options, like colors or features, you have to understand how that disrupts the comparison. You also need to consider if someone got that OTD price because of a particular financing method – manufacturers often tie discounts to financing. You’ll see an example of this later.
Finally, use Cargurus and look for all the lowest prices within your area. Your area means the distance you would be willing to drive to get a car.
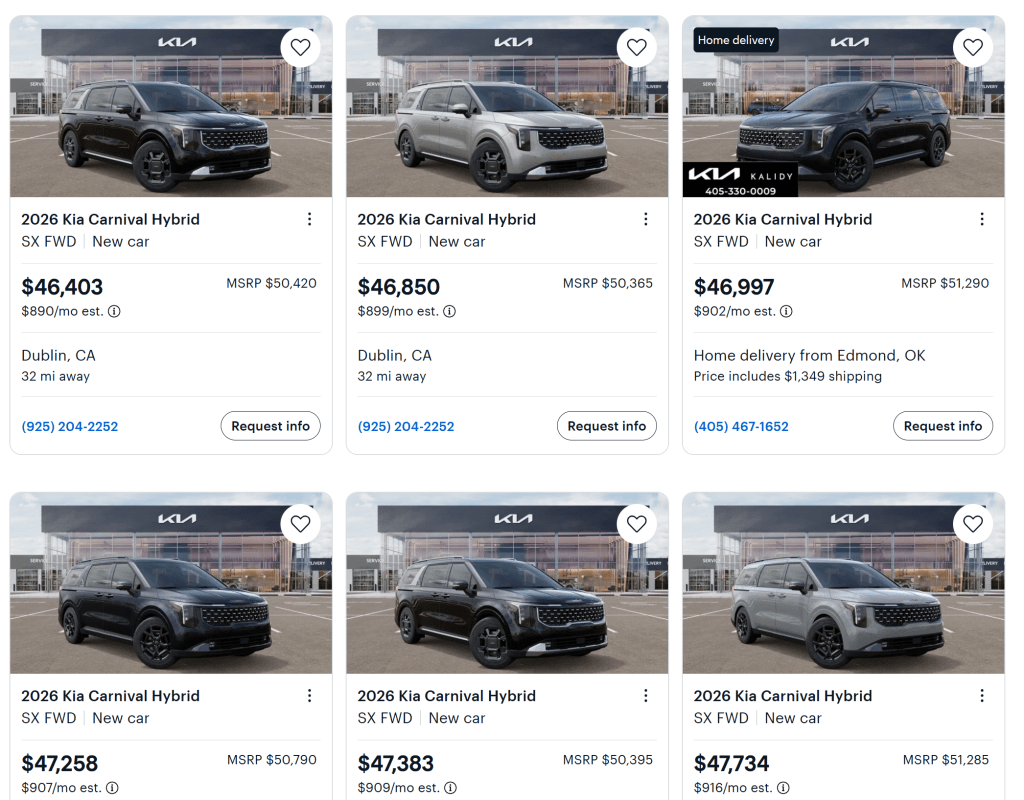
Your goal in this step is to get a sense of what people are paying: 5 examples from the last month, a reference from Edmunds, and a sense of which dealers are offering the best prices on Cargurus.
I had been watching Cargurus for a while and noticed that one dealer almost always had the best Carnival price in the area, like a doorbusters type of price. On the day I started my outreach, I saw they were selling a 2026 Hybrid SX for around $46.9K.
My thinking here was well, this dealer always advertises the best rates in this area. Let me see what they’ll offer me. If I could push this down to $46.5K, I would be in great shape, at least 7.5% off MSRP for SX trims in the area.
However, the dealer explained that this pricing was only for those who took the default financing, not the special Kia rates. Essentially the discount was paid by the higher interest rate. They ended up coming back with a formal offer of $48.9K, $2.4K higher than my target, at the lower interest rate. You can see an example of this kind of cash rebate for higher interest rate promotion here:
This is when I decided to push more aggressively because the gap from $48.9K to $46.5K was quite large and I assumed would take significant effort to pull off.
I contacted every dealer I was willing to drive to so no single dealer could wait me out. If no dealer engaged, that would have told me my number was wrong. I sent this message:
Hi, I am looking to purchase a 2026 Kia Carnival Hybrid (8-seater) this month.
Here is exactly what I’m ready to sign on:
SX Hybrid
- Target OTD: $46,500 before taxes & DMV
- Kia Financing at 2.99% for 60 months, $0 down
SX Prestige Hybrid (8-seater)
- Target OTD: $49,000 before taxes & DMV
No dealer add-ons, paint packages, or markups.
I have excellent credit, no trade-in, and I can sign immediately for the right unit at the numbers above.I’m currently collecting written offers from several dealerships.
If you can match or beat the pricing above on a specific VIN, please reply with:The VIN
The exact OTD breakdown before taxes/DMV
Confirmation of the 2.90% rate
If the numbers work, I will come in and buy the vehicle.
Thank you.
Breaking down the offer, I used the 3 components we discussed above.
1) I shared exactly what I wanted and didn’t want. I gave an alternative (SX Prestige) just in case that trim would be more available to deals. I also made it clear I didn’t want dealer add-ons or forced packages.
2) Traditional thinking suggests that you go in to buy at the end of the month because that’s when dealers want to make sure they hit their targets. But the counter argument is that everyone knows this and tries to get deals at the end of the month. My thinking was, why don’t I try the beginning of the month and if I don’t get what I want, I’ll have the entire month to get one dealer to bite. But they’ll all know I am ready to give them money, and one dealer’s sale is a loss for everyone else.
3) I actually had not looked at pricing on Edmunds or communities before settling on $46.5K. But calculating from MSRP and general research about new car sales, it felt like 8% and above MSRP would be a strong discount. I also had seen pricing from when 2025 models were being heavily discounted to make room for 2026 models, so this had given me another reference for “good” pricing.
They all had an equal opportunity to compete for my business and knew what would get me to sign. They also knew I was committed and ready to buy that day.
If no one engaged, that would have been a clear signal that my price was unrealistic.
This is where my approach diverges from how most modern negotiation advice focuses on tactics: when to ask, what to say, how to anchor, and how to apply pressure. That advice is not wrong, but it assumes the negotiation itself is the main problem.
My experience has been the opposite. Deals stall not because people use the wrong tactics, but because the situation itself is poorly structured.
Instead of trying to “negotiate better,” I try to structure the situation so there is very little left to negotiate. I define exactly what I want, when I am ready to buy, and what would cause me to walk away. That turns the conversation from persuasion into a simple decision.
This is why I was willing to make the first offer, knowing I was contacting enough dealers that someone had an incentive to say yes. The goal was not to outmaneuver anyone, but to remove uncertainty. Once the numbers were clear and my willingness to transact was credible, the negotiation largely ran itself.
And now, to the rest of the story:
In my message, I also mentioned I wanted SMS or Email follow-ups but not phone calls since it was a work day. I believe all the dealers got back to me within a few hours (they have automated systems with template messaging), and I simply repeated the messages. Anyone who called I didn’t respond.
Some dealers asked if I had an offer already, and that they would beat it. I told them I was in process. Other dealers didn’t read what I said, so I deprioritized them.
One agent told me my offer was quite reasonable (remember, this would have been lower than any advertised rate AND included the special Kia financing) but they couldn’t move unless I got an offer for them to beat or match.
The original dealer, the doorbusters, stuck to their price, so I said no problem, happy to come back later in the month.
In general, everyone was playing the game. Some dealers will not negotiate without a competing offer. That is not a failure of this approach. It is a signal to move on.
And so one dealer did. They offered $47,395 with the low interest financing with a deadline of that day. Not phased by the deadline, I told them I needed some time to look at it. This was my being silent, adding a pause to the SMS conversation.
They had given me a link to a video of the car, and so I confirmed the colors were good. Also included were special options: premium floormats, exterior color, and “dark edition” aesthetic package. $1,800 of options that I did not mind but would not have paid for.
Within an hour, they came back with an additional $500 off, so we were at $46,895. That was pretty good, but it got me to think, they gave me that completely unprompted. I don’t think that’s the absolute bottom offer. So I waited another hour, deliberately doing nothing, and then reiterated the same target, $46.5K.
If you can bridge the remaining $395 and get the selling price to $46,500 with the same terms we discussed (2.90% for 60 months, $0 down, no add-ons or markups), I will come in this afternoon to finalize everything.
Two hours later, they replied, “Thank you for the offer Michael. However, we are already all in at $46,895 plus tax/fees (no add-ons or markups) at 2.90% for 60 months. Offer is valid for 12/5/25.”
I was disappointed, but I remembered 1) I had the whole month to make this deal 2) the signals so far suggested I could do it – they couldn’t be the only dealer willing to make these large concessions 3) they might be bluffing.
I responded immediately with “I am sorry to hear that. Thanks for trying! We were so close.” to suggest I wasn’t going to budge but to also be respectful and kind to the individual working with me.
I then gave them 30 minutes – if they didn’t follow-up I’d start approaching another dealer who seemed like they wanted to enter negotiations and not just wait for an offer to beat.
40 minutes after my thank you note, I got: “Hi Michael! Great news! My manager says he will do! $46,500 plus tax/fees (no add-ons or markups) at 2.90% for 60 months”
We had a deal! From my first message with this specific dealer over SMS to the final confirmation took about 5 hours, 6 hours from my first message to the original doorbuster dealer.
I could have tried to shop that deal around, but I felt a responsibility to honor my commitment. I got the price I wanted, based on knowing what a good price was beforehand. I drove the deal quickly and didn’t have to stress any further.

In the end, the car was 9.5% off its MSRP, but most importantly, was well below anything publicly advertised at any interest rate. It ended up being more than $1K below Edmunds’ price even though Edmunds was using the MSRP (4% off) with no options and I fared exceptionally well with comparisons on Reddit.
The discount was the outcome, but the real win was in controlling the process. If you are not rushed, not defensive, and willing to walk, the other side is forced to decide instead of negotiate.